Installation

The schematic on the right is the schematic diagram of a standard installation where you have a toggle switch for filling and draining and another switch for running both pumps at the same time.
The wiring behind the standard control panel can look complicated, depending on what kind of switches are used, but in the end, it is just a PLUS wire going to it, and a FILL PUMP and DRAIN PUMP wire coming out of it.
Some marine toilets have no fill pump but rely on a pressurized water source and have a solenoid to fill the bowl instead of a pump. The wiring remains the same though, it is just a solenoid instead of a water pump.
FlushRobot
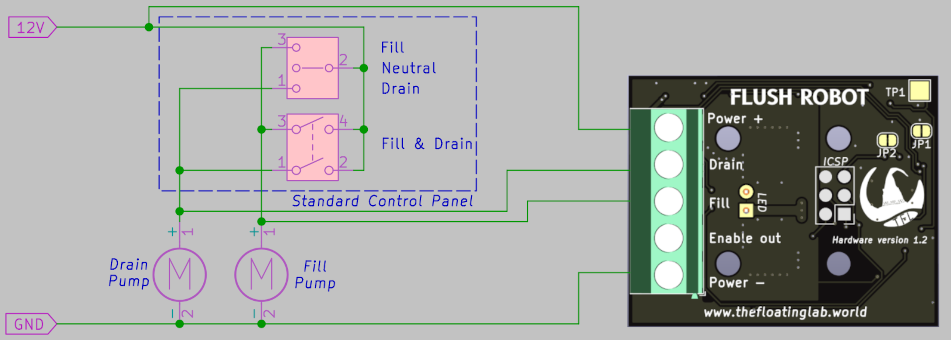
Installing the FlushRobot requires no modifications. Just connect the ground (minus) and power supply (pwr) to the FlushRobot, and wire the drain and fill outputs to the respective pumps. That's all!
FlushControl
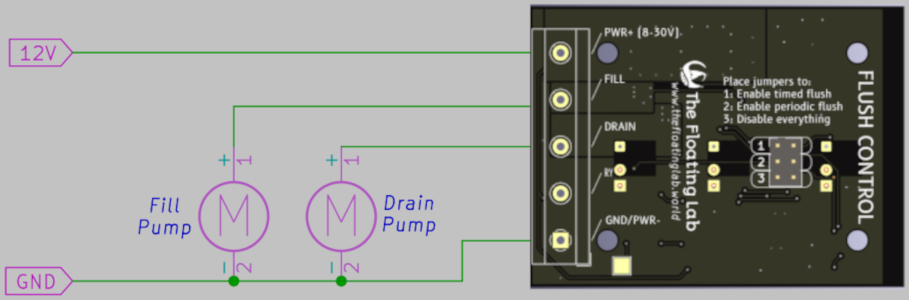
Installing the FlushControl requires removal of the original control panel. You run the positive wires from the fill and drain pumps directly to the FlushControl circuit board as shown in the schematic diagram.
Commissioning
After the installation, before you can use the FlushRobot, you have to run the Setup Mode first.
Setup
After powering up the FlushRobot for the first time, it will automatically enter setup mode. If you want to invoke the setup mode later on, on the FlushRobot model hold the Drain button of the power while powering up the FlushRobot. On the FlushControl model hold the Robot button for 10 seconds until the LED starts flashing, then, while holding the Robot button, press the Drain button.
If you invoked the setup mode by holding the Drain button, you have to release it any time after three seconds.
Once in the setup mode, the robot LED will light.
FlushRobot only: If you want to set the maximum bowl fill level, you have to start this procedure within 30 seconds. If you want to configure the periodic flush, you have to wait for the timeout of the 30 seconds.
Setting the maximum bowl fill level
The maximum bowl fill level needs to be set, so that during the hose cleaning mode, this level can be used for the final flush. Once set, the built-in safety feature of the FlushRobot will make it impossible to exceed this fill level even manually, as the drain pump will engage automatically to prevent overfilling the bowl.
Setting the maximum fill level is based on time, as the FlushRobot has no means to sense the amount of water entering the bowl.
Perform this setup with a battery voltage which is somewhere in the middle of the normal operation window, like around 13.2 Volts. Avoid performing this procedure with voltages below 12.5V or above 14V. Double these voltages for 24V systems.
When setting the maximum bowl fill level, keep some reserve for rough sea conditions and/or heeling of the boat.
Within 30 seconds after the LED lights up, start filling the toilet bowl with the Fill button to the maximum level. Do not release the Fill button in between, hold it until the desired maximum fill level has been reached, then release the button.
Immediately after releasing the fill button, the drain pump will be activated. During this process, it will record the electrical current through the pump as a reference, and the time to empty the bowl. It will sense when the bowl becomes empty and air starts to be drawn in by observing the drop in electrical current.
If, for some reason, the bowl becomes empty but the drain pump keeps running, you can interrupt the process by pressing the Fill button briefly. You will then have to repeat the setup procedure.
If the drain pump stops before the bowl becomes empty, you have to repeat the setup procedure.
If the procedure was successful the parameters will be stored in ROM, the setup mode ends and the FlushRobot is ready for normal use.
If there was a problem, the FlushRobot will enter error mode, and the number of flashes indicate what went wrong.
Configure periodic flush
This is configured differently on the FlushRobot and FlushControl models.
FlushRobot
The FlushRobot comes with periodic flush disabled. If the FlushRobot is new and you don't want to use the periodic flush feature, you don't have to enter this configuration mode. Otherwise follow the procedure below, also to disable it after you had it enabled previously.
Enter setup mode as described above. Once the LED lights, do not touch any button for approximately 30 seconds. The LED will then start flashing rapidly.
If you want to enable periodic flush, press the Drain button. If you want to disable periodic flush, press the Fill button.
After this, the new configuration will be stored in ROM, the setup mode ends and the FlushRobot is ready for normal use.
FlushControl
The FlushControl has a jumper installed to enable the periodic flush. To disable this feature, remove the jumper.
Usage
Use and flush the toilet normally. FlushRobot is not designed to completely take over the flushing process, because - without getting into details - the bowl content and the required flush process is different with every use. The FlushRobot assumes that you will manually flush the toilet until the bowl is emptied.
Hose flush cycle
After the manual flush cycle, it is time for FlushRobot to do its job and make sure that the hoses will be flushed.
The LED starts flashing slowly, to indicate that a hose flush cycle is required. You can either manually start the flush cycle right away, but you can also just walk away. In the latter case, after about 5 minutes after the last button press the LED will start flashing rapidly, and ten seconds later the hose flush cycle starts.
To manually start the flush cycle, on the FlushRobot you double press the fill button, on the FlushControl you touch the "Robot" touch button. Note that you can only start the flush cycle if you first have used the fill and drain buttons. The flush cycle is meant to be used only after the bowl has been emptied.
The flush cycle starts by sending a vibration signal to the drain pump which results in an audible warning beep. By pressing any button the flush cycle will be postponed for another 5 minutes. Once the hose flush cycle has started, you can press the drain button to abort the process.
It will three times fill the bowl with some water and run the drain pump until it senses that the water is gone. This is done to make some "head room" in the lower part of the toilet to make sure there is no dirt left that can dilute the cleaning water in the next step. It will then fill the bowl to the configured maximum level, which will then allow the Flush Robot to run the drain pump long enough to really flush out the hoses and leave them filled with clean water.
Note that the automated hose flush cycle will be postponed if the battery voltage is below 12V (or 24V in case of a 24V system), to protect the battery. The hose flush cycle can still be invoked manually.
Periodic flush
The periodic flush is disabled by default, but you can enable it via the setup mode.
The periodic flush is a brief flush every 4 hours after the last button press. This is intended to keep the water oxygenated to prevent the "rotten egg smell" which results from decaying plankton. The cycle consists of pumping some water in the bowl and pumping it away. No warning beep is given, to keep the whole process as quick and silent as possible.
The periodic flush will halt if the toilet is not used for more than 7 days. This is a safety measure.
Note that the periodic flush cycle will be postponed if the battery voltage is below 12V (or 24V in case of a 24V system), to protect the battery.
Disabling and re-enabling
In some situations you might want to disable the hose flush cycle and periodic flush cycle, like when you are in a marina and have the toilet exit routed to a black water tank and don't want to fill the tank too quickly.
FlushRobot
Double press the drain button. The LED will flash three times when the automated flush is disabled. You can check if it has been disabled by pressing one of the buttons afterwards. If the LED does no longer blink the system has been succesfully disabled.
To re-enable a disabled system, double press the drain button again.
FlushControl
You can disable the automated flush by removing the jumpers on the circuit board. You can also disable the automated flush by holding the Robot button for 10 seconds until the LED starts flashing. While holding the Robot button touch the Drain button to disable the automatic flushing, press the Fill button to re-enable the automatic flushing.
Safety
Any pump, especially salt water pumps due to their unlimited water supply, forms a safety risk. If run uncommanded, or when a connected hose fails, it can potentially flood the boat and sink it, leading to loss of property and life.
The following safety features have been built into the FlushRobot:
The FlushRobot senses the voltage on the output terminal of the Fill pump. If it senses an uncommanded voltage for longer than the time to fill the bowl to the configured maximum bowl level, it will start the drain pump, empty the bowl, and repeat this process as long as the Fill pump keeps running. This feature protects against manual overfilling, as well as electrical failures (short circuits to the fill pump) that could result in flooding the boat. This protection disregards the low battery voltage protection, as keeping the boat afloat is more important than keeping the battery healthy. The FlushRobot will keep working until the battery level drops below 5V, at which point the fill pump will soon stop producing any output if not already done so.
The FlushRobot has a microcontroller with a built in watchdog. If a certain software point is not triggered every 4 seconds, the microprocessor will reset automatically. The most likely culprit would be a lightning strike on or very close to the boat, sending the processor into an undetermined loop. By automatically resetting the processor the FlushRobot will re-enter a safe state with all pumps powered down.
The FlushRobot measures the current to the drain pump. If the current is far below the current measured during the setup, it will assume that the connection to the drain pump is broken and it will enter the error mode. If the current is much higher than recorded during the setup, it will assume that the drain pump has seized, is blocked, or has short circuited, and in these cases it will also enter the error mode.
Any switch in the fill pump system, including the internal fill pump switch of the FlushRobot, can fail into the "on"-state, for example after a catastrophic lightning strike or water ingress in the circuit, and result in a runaway fill pump. This means that the FlushRobot, like any additional circuitry, forms an additional risk. Then again, the FlushRobot protects against flooding by sensing that something is wrong and it will activate the drain pump in response. It so not only guards against its own switch failing but also against the failure of the mechanical switch of the original control panel. In the end, it can be argued that the FlushRobot is a nett safety enhancement, but it is up to the user to weigh the risks. Catastrophic events like (but not limited to) voltage excursions, lightning strikes and water ingress can have unpredictable results including failures of the built in safety systems.
Regardless of FlushRobot, a live sea water pump circuit and open sea cocks always pose a risk if the boat is left unattended. We recommend the good practice to pull the associated circuit breaker and/or close the sea cock if you leave the boat. After an electrical "event", such as a (nearby) lightning strike, always check that no pumps are runaway.
Troubleshooting
- No activity at all
- Check the power supply (both the minus and the plus) to the FlushRobot.
- The LED blinks but automatic flush does not start after 5 minutes
- The automatic flush will not start if the battery voltage is too low. Check that the voltage, as seen by the FlushRobot/FlushControl is at least 12.1V (or 24.2V on 24V systems).
- During the robot flush, the drain pump stops before the bowl is empty
- This can incidentally happen while during draining a sudden huge battery load comes on line, resulting in a voltage drop. The resulting drop in current is then interpreted as sign that the bowl is empty. If this happens regularly, it might be that the setup procedure was executed with a too high battery voltage. Rerun the setup procedure.
Error modes
All error modes are fatal. That means that there is no way to exit the error mode, other than powering down the FlushRobot. Error mode is indicated by repeated LED flashes. The number of flashes indicates the type of error:
- One flash
- This is not an error but just an indication that a button press was observed and that FlushRobot is now counting down to perform its hose flush cycle.
- Two flashes
- If this error occurs during setup mode, it indicates that the recorded time to fill the bowl was too short, or could not be detected at all. Rerun the setup mode to try again.
- Three flashes
- If this error occurs during setup mode, it indicates that the recorded time to drain the bowl was longer than the time to fill the bowl. Something might have gone wrong, so rerun the setup procedure. If the error persists, it means that the fill pump is faster than the drain pump, which is a potentially dangerous setup. The FlushRobot is not compatible with such systems. Contact TheFloatingLab with details about your toilet system.
- Four flashes
- The measured current to the drain pump was significantly lower than expected. This might indicate a broken drain pump or connection. For your safety, the FlushRobot went into error mode. If you think the drain pump is ok, it is possible that FlushRobot recorded a too high current during the setup procedure. Rerun the setup procedure to record a new nominal drain pump current.
- Five flashes
- The measured current to the drain pump was significantly higher than expected. This might indicate a seized or blocked drain pump or a short circuit. For your safety, the FlushRobot went into error mode. If you think the drain pump is ok, it is possible that FlushRobot recorded a too low current during the setup procedure or that some bearings have aged. Rerun the setup procedure to record a new nominal drain pump current.