Many cruisers consider watermakers a necessary evil. It is a luxury to have fresh water all the time without having to fill up jerrycans from questionable sources a couple of times per week. But it comes with a prize: energy demands, noise and maintenance. We selected a watermaker with low energy demands and after two years of cruising we have optimized our setup and reduced and simplified the required maintenance. You don't have to reinvent the wheel: read our tips and tricks.
Types and brands
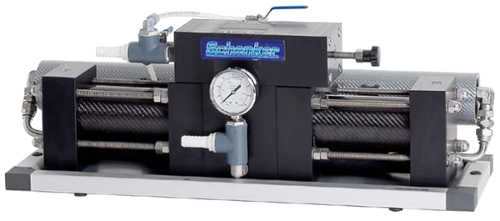
This chapter is not intended to favor a specific brand. We choose for a Schenker model 30 because we could buy a used one in good shape and it matched our criteria. After two years of living entirely on watermaker water, we can say that we are happy with this watermaker, it has low maintenance and has been problem free so far, with one exception: the pump. We found a solution for this problem, more about that later.
When we bought ZwerfCat it already had a watermaker but it took a lot of space, was noisy as hell, and difficult to maintain. The main problem however was that it used a lot of power. Really a lot, about 2000 Watt to produce 90 liters per hour. We had to start the generator to run the watermaker, but since it was our intention to get rid of the generator and operate solely on solar power, we also had to find a more energy efficient watermaker.
Energy recovery
To force seawater through a reverse osmosis membrane a pressure of about 60 bars is required. Only a small portion (about 10%) of the water is actually forced through the membrane. The rest, now enriched with the extra salt which was left behind, called brine water, is simply dumped overboard. To pressurize water up to 60 bar takes a lot of energy, and it is a waste that 90% of that water is simply dumped overboard without re-using the pressure. Fortunately, there are some watermakers that re-use this precious energy, and these watermakers are usually marketed as "energy recovery" models. They use a relatively low pressure (7 bar) pump, and a pressure amplifier (Clark pump) that recovers the energy in the brine water to boost the pressure up to 60 bar, somewhat comparable to a turbo in a combustion engine. Spectra was the first brand with an energy recovery model, followed by Schenker, and nowadays there are more brands that use the same concept.
Our Schenker 30 only uses about 9-10 Amps (which equals about 120 Watts) to produce 30 liters of water per hour. This is 4 Watts to produce one liter of fresh water, quite a difference with our previous "brute force" watermaker which needed more than 20 Watts per liter! Well, to be honest, these advertised 30 L/h are really a bit overoptimistic. In reality our production was more around 20 to 25 L/h (which is still less than 6 Watts per liter), until we modified the pump.
Capacity
A word about capacity. More is not always better! In reality there is only one reason for wanting a high capacity watermaker, and that is when the watermaker uses so much power that you have to run the engine or generator to use it. Only in that situation you want to make as much water as possible in the shortest time. If however the watermaker uses so little power that it can operate on solar power there is no need to hurry. In fact, it is better to have a lower capacity watermaker so you can "spread out" the energy required over multiple "solar hours".
Installation
Things they usually don't tell you in the installation manual:
Pump location
For pure technical reasons, it is often recommended to mount the pump (and assorted filters and valves) below the waterline. We don't like that at all, because there are a lot of hose connections associated with this contraption, each of them increasing the risk of mishaps resulting in a flooded (or sunk) boat. We opted for having just one hose running up from the seacock until clear of the waterline, and to have the prefilter, valves and pumps all above the waterline. The disadvantage is that there is a slight loss of efficiency because the pump has to lift the water above the waterline and sees a negative pressure on its inlet, and tiny leaks cause air to be sucked into the system. Well, we still prefer tiny leaks to result in air inside the watermaker rather than in water leaking into the boat...
Auxilliary input
Normally the pump draws its input water from the sea. But when cleaning the membrane with chemicals, it is necessary to draw the input water from the output of the watermaker, to keep the chemicals cycling. The manual suggests disconnecting the suction hose and run a hose from a bucket, but we hate to disconnect hoses because it gets harder over time and after reassembly they will often leak. So we Tee'd an auxilliary suction hose with a valve into the main hose and can thus select either input by just opening/closing two valves.
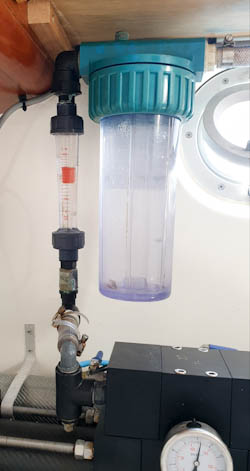
Filter type
Our Schenker came with a 5" prefilter, but these elements are hard to get. So we replaced it by a 10" filter. Some people prefer to have a dual filter setup, with a 20 micron filter followed by a 5 micron filter, in an attempt to have a longer time between filter replacements. Downside of this strategy is that flushing with fresh water at the end of the production run now requires much more fresh water.
Filter housings
Be careful when selecting a filter housing. After years of experience, I have the following requirements:
- Clear housing. I want to see what is going on, and when to clean the filter.
- Make sure it is up to the intended pressure. For an energy recovery water maker, the pressure is about 6 bar, but it can rise to 9 bar or more before the over pressure stop valve kicks in. Many cheaper filter housings are not designed for these high pressures. I heard reports of exploding filter housings, so beware! An indication is the filter bowl, it should have vertical reinforcement "bars".
- A pressure relief valve. This is a small button on top of the filter housing, in our installation we don't only use it to relief the residual pressure before screwing off the bowl, but also to release the trapped air after filter maintenance. Instead of forcing the unavoidable pocket of air in the top of the filter housing through the water maker, we hold this button until all the air has escaped.
You already have a good filter housing? Then buy a spare! I met several people with a broken filter housing at some location where it was hard to obtain a replacement.
A filter housing that meets my requirements, available at Amazon.
I earn a small commission if you buy it via this link, thanks for supporting me!
Filter location
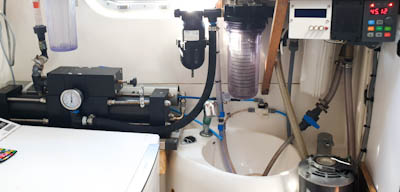
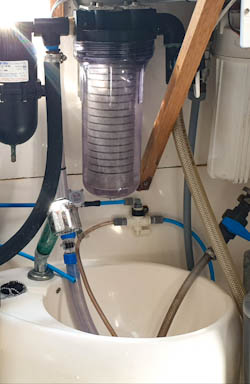
One recurring maintenance issue with watermaker is the replacement and cleaning of the pre-filter(s). We found that we are often reluctant (read: lazy) to perform maintenance if the operation is too cumbersome and/or messy. The old watermaker of ZwerfCat had its filters in the bilge, so we had to take away stuff occupying the floor, take away the floor panel, fumble inside the bilge and spill a lot of water which worked its way over the entire length of the ship, and had to be mopped up afterwards. Which invited an attitude of "nah, let's do the darn filter another day"... So with the new installation we wanted the pre-filter housing as accessible as possible with little concern about spilling any water.
On ZwerfCat we had, as is typical for catamarans of this size, 4 cabins, each with their own bathroom. Since we found 4 bathrooms just a little too much for us two, we converted one bathroom into a "technical wet room". We took out the toilet, put a washing machine in its place, and used the rest for the watermaker installation and beer brewery.
This is just great! In case of any leaks or spillage, we just press the button of the drain pump and the puddle on the bathroom floor is gone. We installed the pre-filter just above the sink, so cleaning/replacing the pre-filter doesn't even wet the floor!
Another advantage is that the brine output is routed simply into the sink. It not only saves an additional hole in the hull, but it is really handy if we want to apply chemicals to the membrane (pickling and/or cleaning). We put the plug in the sink, put some fresh water in it with the chemicals, and open the auxilliary suction hose which is Tee'd into the main suction hose and also ends in the sink, and that's about it. When the procedure is finished, we close the auxilliary suction valve, unplug the sink and we are done. No temporary hoses and we don't even need a bucket!
If you don't have a spare bathroom, you might still be able to install the watermaker against the bathroom wall, concealed by a curtain. Friends did this in their monohull, it looked clean and they were happy with the result.
Reversed filter housing
A common way to clean filters is to apply a reverse flow to them. Of course this water needs to be filtered already otherwise it could contaminate the filter on the clean (output) side. A neat way to clean a pre-filter is to plumb it in reverse into the output (brine) flow of the watermaker. The brine water has already passed through a filter so it is known to be clean, and the residual pressure is enough to overcome the tiny restriction of the to be cleaned filter.
Flow gauge
The Schenker watermaker (our 5000 Euro model appears to be a "budget" version) didn't come with a flow gauge. Instead, the manufacturer recommends using buckets to measure the brine flow. This is acceptable if you only need to do this once to check the installation, but we found that knowing the flow at any moment offers very useful information about the state of the pump and filters, and is very helpful with troubleshooting. We bought a cheap mechanical flow gauge on Amazon and plumbed it into the brine output. If we want to know the total flow, we only have to add the production water flow (a quantity you usually know by other means) to it. The brine flow is approximately 10 times the production capacity, so for a 30L/h watermaker the brine flow should be about 300 L/h. A flow meter with a maximum flow of 400 L/h would be suitable in this case. The brine output of the watermaker is low pressure, so anything will be ok for the job.
A 400L/h flow meter, same as I use, available at Amazon.
I earn a small commission if you buy it via this link, thanks for supporting me!
Float switch
With a flow of 300L/h (for a tiny watermaker) the potential for disaster when a hose gets loose is high. Never run the watermaker unattended: The pump will happily pump the boat full of water until either the ocean is empty, the power is gone, or the boat has sunk, whichever comes first. We therefor installed a small float switch in the bathroom where the watermaker is installed, and wired it in series with the pump relais. If somehow water accumulates under the watermaker, the float switch cuts out the pump. This has already happened in our case: one of the many hose connections worked itself loose due to the pulsing high pressure, and while we were on the boat we didn't notice this until the float switch automatically depowered the pump.
A suitable float switch, available at Amazon.
I earn a small commission if you buy it via this link, thanks for supporting me!
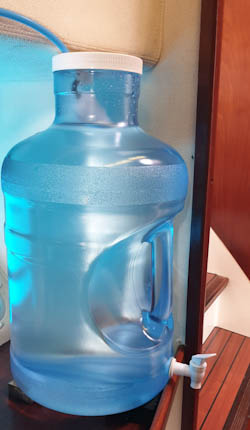
Day-tank
Water from the watermaker tastes quite good, but after lingering for a while in the main tank, it always develops some "tank taste". We were also concerned about tiny amounts of aluminium of our tank dissolving into our drinking water: there is some suspicion that aluminium might be a factor in the development of Alzheimer, and anyway it is not by any means contributing to our health. So we made a habit of collecting some water straight out of the watermaker into bottles to use for drinking. After a while however we wanted to make this procedure somewhat easier so we bought a consumption grade 20L BPA free "bottle" with tap valve to use as our "day tank". We wanted to have a large lid, to facilitate cleaning, and to install a float valve for automatic filling.
A 20L/5G BPA free tank with tap valve, large diameter lid, available at Amazon.
I earn a small commission if you buy it via this link, thanks for supporting me!
We installed a small float valve in the lid, so we can never overfill the tank. The hose which transports the production water to the main tank has an upward loop, and before this loop we installed a T-junction with a hose to the float valve. So when water is being produced, it favors going to the day tank until its float valve closes and then the water has no other choice than to go "over the bump" to the main tank. This way, we always have automatically fresh water from the watermaker in our day tank, and since the consumption rate is high compared to its volume, the water never stays very long in this tank. If it would ever develop a tank taste (after several years it still hasn't), the tank would be easy to clean out via the lid, with no chemicals required.
A float valve with connection material, available at Amazon.
I earn a small commission if you buy it via this link, thanks for supporting me!
Maintenance
Our Schenker watermaker doesn't require much maintenance. This is our experience after two years of living solely on watermaker water.
Flushing
Watermaker manufacturers tell you to flush the watermaker after each production run with fresh water. This is quite a waste, especially with low capacity watermakers you will end up spending half an hour worth of production for just flushing the membrane. Many people are claiming though that if you run the watermaker within two days again, this flushing isn't required. We never did this flushing, except when we would not use the watermaker within a two days again (which almost never happened), but we had to clean the membrane once a year. It is unsure if this cleaning could be avoided by flushing after each single use. Even then, we rather clean the membrane once a year than spending many hours of waterproduction (and power) just to avoid this simple procedure.
Spare parts
In two years with approximately 1000hrs of usage, we used four Shurflo pump diaphragms. The Shurflo pump is really the weak spot. We might have had accelerated wear on the Shurflo pumps due to the main unit pistons binding in their cylinders. And that appears to be the other weak spot: Although all our seals hold out fine during these 1000hrs, the seals of the pistons hardened or abbraded, which caused the pistons themselves touching the cylinder walls, causing scratches on both the pistons and cylinder walls and greatly increasing the resistance. We would recommend to carry additional sets of piston seals and checking/lubricating/replacing the seals regularly. The problem presented itself by the pressure going up (which we contributed to membrane fouling which was partly true), a lower flow (which we contributed to Shurflo pump wear which was partly true), and by moaning/squeeky sounds coming out of the main unit between the "beats" which we could not identify (and also not the dealers we consulted).
Filters
We regularly swap filters (which is easy thanks to our installation) to prevent smells of decaying plankton and to keep as much flow as possible. We clean the filters with a reverse flow of water, and/or by hanging them on a line over the bow when we are anchored. After drying they are good to go again, and this process can be repeated many times.
Lots of effort goes into the free information pages and services of this website. If you want to show your appreciation and support my efforts, you are welcome to contribute with a donation to my personal Paypal account.


